


INTRODUCTION
Thoracic disc herniation (TDH) is a symptomatically disabling condition that is technically difficult to manage, associated with complications, and unfamiliar to many surgeons. The past decade has been a golden age in the field of minimally invasive spine surgery. Minimally invasive procedures for TDH have also progressed. The plethora of available techniques indicates that a single method may not be practical for every case, and the surgeon may need to tailor the technique based on the patient’s presentation. In this review paper, the authors discuss the available techniques for TDH and provide insights into the clinical decision-making process.
Broadly, techniques to treat TDH can be classified according to the magnification tools involved as endoscopic or microscopic procedures. Based on the approach, procedures are classified as posterolateral, lateral, and anterior transthoracic approaches. The choice of procedure depends upon the available instrumentation and the familiarity of the surgeon with the instruments in question. Considering the rarity of TDH, it is often difficult for inexperienced spine surgeons to manage patients with this condition. An adequate understanding of the various available techniques is essential to help the surgeon choose an appropriate strategy.
EPIDEMIOLOGY AND CLINICAL FEATURES
Herniation is relatively rare in thoracic discs compared to the lumbar and cervical levels. The prevalence of TDH has been reported to range from 6% to 40% in various studies [1,2]. According to Han and Jang [2], the prevalence of incidental TDH is 6.5%. It is more common in males than females, and tends to occur between the fourth and sixth decades of life. The lower thoracic spine is commonly affected, with the most frequent level being T8–9. Only 4% of TDH cases are above T4–5 [3]. TDH is more frequent in patients with existing lumbar disc disease [2]. However, most such cases are asymptomatic, and few require surgical intervention [1]. The majority of cases are central (two-thirds) and the rest are paracentral (one-third) [4]. TDH is common in patients with Scheurmann disease [5].
The presentation of TDH varies depending upon the level involved. Thoracic back pain is a presenting symptom in most cases. Neck pain may be seen in cases above T4–5. Girdle pain and myelopathic symptoms manifest in cases of root and cord compression, respectively. TDH is generally diagnosed at an average of 15 months after symptom onset [3]. Often, the presentation is a combination of ataxia, motor deficit in lower limbs, paresthesia, and bowel and bladder symptoms. Acute neurological worsening is a rare but potential crisis. Guest et al. [6] described paraplegia resulting from occlusion of the anterior spinal artery by central TDH. Disc herniation at the T1–2 level may cause Horner syndrome, along with T1 dermatome pain [7].
SURGICAL TECHNIQUES
Axial back pain and radicular pain are initially treated conservatively. Failure of conservative treatment is an indication for surgery. Myelopathic signs are an indication for early surgery, and patients with signal changes on magnetic resonance imaging (MRI) without neurological involvement may benefit from early surgery [8].
1. Relevant Anatomy
For safe thoracic surgery, it is essential to understand the anatomic relations of the thoracic spine. The aorta, the azygous vein, the sympathetic chain, the artery of Adamkiewicz, and the diaphragm are the clinically important structures [9]. The relationships of these structures are described in Table 1.
The artery of Adamkiewicz is the main feeder of the anterior spinal artery in the thoracic and upper lumbar regions. It arises as a branch of the posterior intercostal artery, and its level varies from T9 to T12, which is also the most common site of TDH [10]. This artery supplies 68% of the blood to the lower thoracic and upper lumbar areas [11]. In transthoracic procedures, there is a possibility of injuring this artery due to its variable anatomy. Hence, recent studies recommend identifying the artery of Adamkiewicz preoperatively by its typical “hair-pin” bend structure on MRI angiography. It is advocated to approach from the side opposite the location of the artery to avoid injury [11].
2. Preoperative Evaluation
The MRI evaluation of disc herniation is an important component of the clinical decision-making process. The surgical approach will be determined by the level, location, and size of the disc, as well as the presence or absence of calcification. In general, central and calcified discs are approached through a transthoracic or lateral extracavitary approach, while paracentral and soft discs are approached through a posterolateral approach. The presence of a giant disc (defined as one that occupies more than 40% of the canal diameter on MRI) indicates a surgical challenge. These discs are often calcified, have intradural extension, and are associated with neurological involvement; therefore, they may not be suitable for minimally invasive procedures in the hands of beginners [12].
3. Identification of the Target Level
A unique problem of thoracic diseases is the difficulty of identifying the target level intraoperatively. Numerous techniques have been proposed in the literature for this purpose, including the deployment of a preoperative coil into the intercostal artery, flexible hook-wire insertion under computed tomography (CT) guidance, vertebroplasty with poly(methyl methacrylate), and the use of intraoperative CT or an O-arm [13-16]. Using an intraoperative C-arm and counting the levels from the sacrum using radiopaque markers placed on the skin seems to be the easiest and most reproducible method.
4. Intraoperative Neuromonitoring
A unique setback of thoracic spine conditions is the risk of cord injury and paraparesis. The thoracic cord is fragile due to the low canal-to-cord ratio, the relative immobility provided by the denticulate ligaments, the scarce blood supply in the watershed zone, and the thoracic kyphosis that pushes the cord anteriorly. Hence, it is recommended to use intraoperative neuromonitoring (IONM) to avoid any unintended cord injury, particularly in the setting of myelopathy [17,18]. IONM may be omitted in cases of transforaminal procedures done under local anesthesia.
5. Surgical Approaches
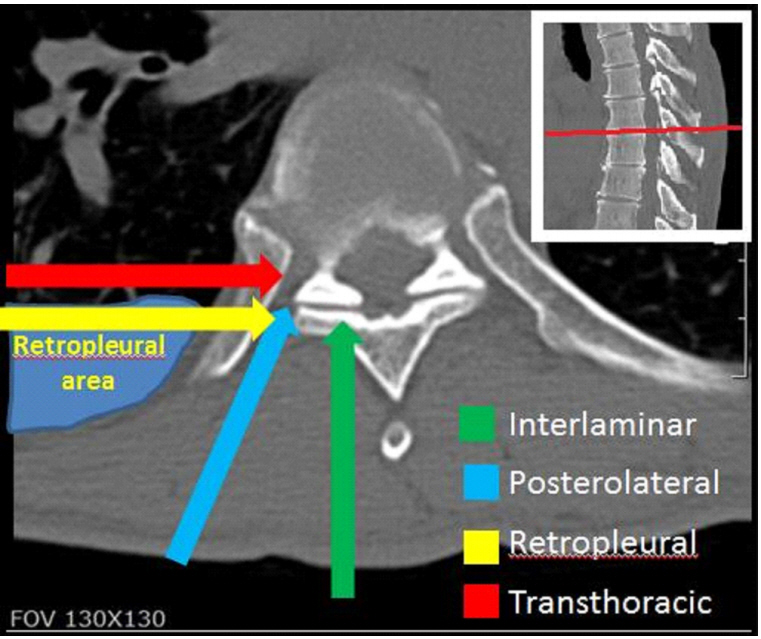
The ideal surgical approach should provide proper visibility of the cord, enable complete access to the herniation, cause minimal morbidity to the patient, and have easily reproducible results. However, such an approach is not available for TDH. Transthoracic approaches provide good access to the herniation, but are associated with pulmonary complications. The extrapleural approach reduces the complications associated with transthoracic approaches and provides equally good access to the surgical field. The posterolateral approaches have the least risk of complications, but provide poor access to the central areas of discs. These approaches are summarized in Table 2. The schematic orientation of the approaches is shown in Fig. 1.
1) Interlaminar approach
The interlaminar approach for TDH has been abandoned because of the high incidence of cord damage associated with the procedure [19]. Additionally, in the thoracic region, the window is very small or absent, meaning that more bone removal is required for entry into the canal.
Indication: The sole indication for an interlaminar approach would be a migrated disc lying dorsal to the spinal cord [19]. The microtubular interlaminar approach is well-known to most spine surgeons.
2) Thoracoscopic approach
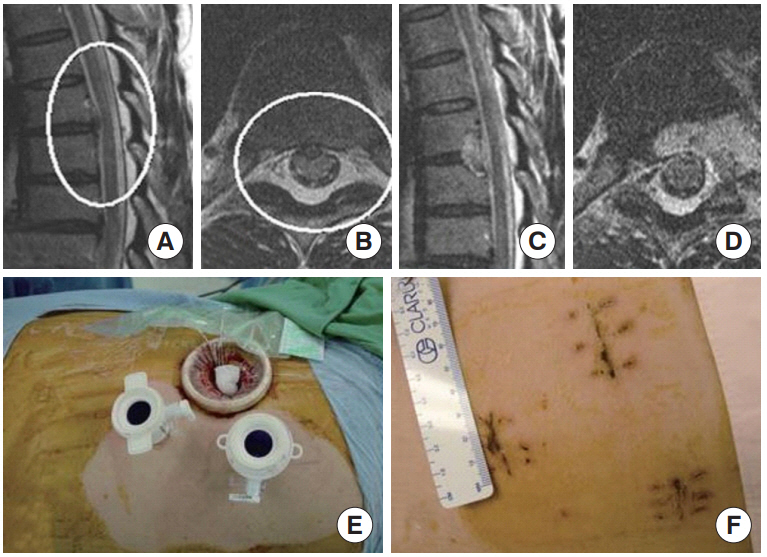
The thoracoscopic approach is the soundest of all minimally invasive access approaches [3]. It provides excellent visualization and access to the herniation and the cord, and avoids the drawbacks of open approaches (i.e., rib resection, postoperative neuralgia, blood loss, and large incisions). It may be considered as the approach of choice for central disc herniations [20].
Indications: Any type of disc herniation can be managed with this approach, as it provides good access to the disc. However, the procedure is generally limited to the following conditions due to approach-related morbidity and its technical difficulty.
(1) Central TDHs
(2) Giant disc herniations causing myelopathy
(3) Calcified discs not amenable to other approaches
(4) Disc herniations from T11–12 to T4–5 in the cranial direction. However, it is controversial as to whether the approach is feasible for T1–4 herniations, as there are conflicting results in the literature [3,12,21].
A clinical example is shown in Fig. 2. The procedure is as follows:
(1) The procedure requires general anesthesia with a doublelumen tube intubation to allow for selective lung ventilation. The lung on the approach side is collapsed.
(2) The side of approach is decided based on the location of the herniation and the artery of Adamkiewicz. The patient is placed in the lateral decubitus position.
(3) The procedure requires three to four portals for execution. The first portal is placed along the mid-to-posterior axillary line perpendicular to the disc space of interest. Another two or three portals are placed on the ventral side in a triangular fashion.
(4) One portal is used for the endoscope (30°) and the 2 other portals are used as working channels. An endoscopic lung retractor is used to protect the lungs from the instruments.
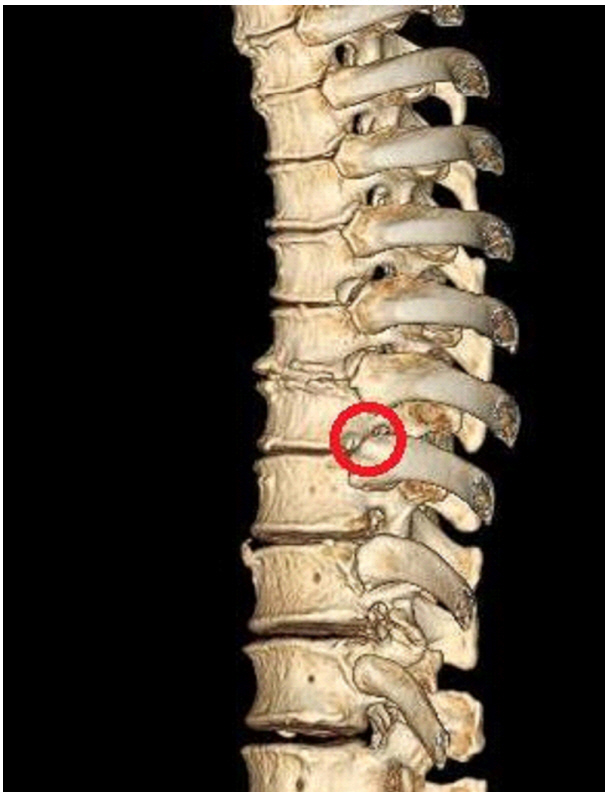
(5) After identification of the correct level, a high-speed drill is used to remove the head of the ribs at the concerned level (Fig. 3). Following this, the dorsolateral part of the vertebral body and the uppermost part of the pedicle are drilled to visualize the lateral part of the thecal sac.
(6) Troughs are made in the vertebral bodies using drills on both sides of the disc to create a working space. It is important to identify the segmental vessels in the midportion of the vertebral bodies to avoid injury.
(7) The disc is then incised, and herniated fragments are removed using a curette, disc forceps, and nerve hook. The posterior longitudinal ligament is incised to check for free fragments in the epidural space. A probe is used gently to check the adequacy of decompression.
(8) A chest tube is placed before lung expansion and kept for at least 24 hours. The wound is closed in layers. An intercostal nerve block to reduce postoperative pain is recommended.
(9) The use of intraoperative CT or an O-arm and navigation dramatically enhances the safety and accuracy of the procedure and makes it easier [22]. The localization of portals, identification of the disc space, and adequacy of decompression become almost effortless. The surgeon can obtain a real-time 3-dimensional image of the bone drill, enhancing the safety and precision of the procedure.
3) Mini-thoracotomy approach
The mini-thoracotomy approach (mini-TTA) was developed by Mayer [23]. Bartel and Peul [21] retrospectively reviewed their cases of thoracoscopy and mini-TTA for TDH and found that mini-TTA was equally good for decompression of the thecal sac, while avoiding the steep learning curve of thoracoscopy. The approach is similar to the thoracoscopic approach and avoids multiple stab incisions, diligence with the use of the endoscope, and a two-dimensional visual field. A microscope is used for the procedure, which provides an excellent visual field with almost no learning curve.
Indications: The indications are same as for the thoracoscopic approach, and mini-TTA is suitable for surgeons unfamiliar with thoracoscopy. The steep learning curve of thoracoscopy is not encountered with this approach.
The procedure is as follows:
(1) Similarly to the thoracoscopic approach, a double-lumen tube is required for ventilation and deflation of the lung on the approach side. However, the approach can be performed even without lung deflation in high-risk cases.
(2) The patient is placed in the dead lateral position with the approach side up and a bolster placed below the chest to widen the rib space.
(3) After identifying and marking the target level on the skin, a 4- to 6-cm incision parallel to the rib is made, centering the target disc space.
(4) The underlying rib is identified and exposed subperiosteally and is resected. In young patients with an elastic rib, the ribs may be separated and access obtained through the intercostal muscles.
(5) After rib resection, the parietal pleura is incised and the thoracic cavity is entered.
(6) A specially designed disposable and inflatable lung retractor is available for lung retraction.
(7) From this stage onwards, a microscope is used. The target level is confirmed under a C-arm and the rib head is resected using a high-speed drill and Kerrison rongeurs. The upper portion of the caudal pedicle may be removed to facilitate exposure.
(8) Next, troughs are made on either side of the disc space using drills and the discectomy is accomplished. It is possible to obtain a good view of the ventral dura through the approach.
(9) Adequate hemostasis is achieved, and after inspection of the re-expanded lung, a chest drain is placed. The wound is carefully closed in layers.
4) Retropleural approach using a tubular retractor
The thoracoscopy approach and mini-TTA may be considered as the gold standard for central disc herniations. However, both procedures require entry into the chest cavity and hence are associated with postoperative pulmonary complications such as atelectasis, pneumonitis, pleuritis, intercostal neuralgia, and the need for postoperative chest tube placement. To overcome these difficulties, Kasliwal and Deutsch [24] developed the retropleural approach. It has a smaller incision and provides equally good access to the disc as the transthoracic approaches.
Indications: The indications are same as that for thoracoscopy and mini-TTA (i.e., central discs and calcified discs). It is suitable in cases that require an anterior approach, but lung pathologies such as bronchiectasis preclude anterior approaches. However, it is less suitable for giant disc herniations, as these herniations are frequently associated with significant bleeding and dural tearing, which may be difficult to deal with. This approach requires familiarity with the tubular retractor system.
The procedure is as follows:
(1) The procedure does not require selective lung ventilation. The patient is positioned in the lateral decubitus position with the approach side up.
(2) The target level is confirmed under a C-arm and the overlying rib/rib space is marked.
(3) Centered over the disc space of interest, a 2-cm incision is made and the underlying rib is exposed using cautery. The space between the ribs, if limited, requires enlargement using Kerrison rongeurs.
(4) Blunt dissection between the pleura and the rib is then carried down to the head of the rib using fingers and peanut swabs.
(5) After locating the rib head, the initial dilator of the tubular system is introduced and passed posteriorly along the ribs down to the junction of rib with the spine. Then, sequential dilatation is followed by docking of the tubular retractor, which is fixed to the table in the standard fashion. A long retractor is used (usually 13–15 cm).
(6) Next, a microscope is used for visualization as the procedure progresses, and the discectomy is accomplished in the standard fashion by drilling out the rib head and the pedicle.
(7) A suction tube is placed in the cavity and the wound is closed in layers. The suction tube is pulled out when the subcutaneous tissue is closed, sucking the air inside.
5) Transfacetal pedicle-sparing approach
The approach was described by Stillerman et al. [25], who conducted a cadaveric morphometric analysis and reported their experiences with 6 patients. This is a posterolateral approach best suited for paracentral disc herniations. The touted advantage of the approach is that it avoids pedicle violation, thereby reducing the risk of chronic back pain. The approach is performed through a midline incision using a microscope and specialized down-angled curettes.
Indications: Soft or calcified paracentral disc herniations. The steps of the procedure are:
(1) Using anteroposterior (AP) fluoroscopy, the target disc space is identified. A 4-cm vertical midline incision is made, centered over the disc space.
(2) Subperiosteal dissection is done from the midline, and the lamina, facet joints, and the traverse processes are exposed on the affected side. Exposure is done from the superior to inferior transverse process.
(3) Under microscopy, using a high-speed drill, the facet is partially drilled out. The starting point of facetectomy and the extent of bone removal are determined by intraoperative AP fluoroscopy so that only the portion of the joint overlying the disc space is removed.
(4) Subsequently, the foramen is exposed and points of bleeding are coagulated using bipolar cautery. The annulus is exposed and incised.
(5) The disc is removed using angled curettes and disc forceps. For medially located disc herniations, microangle curettes may be used to push down the herniated fragments before removal, thereby avoiding cord manipulation and injury.
(6) The extent of discectomy can be confirmed indirectly under a C-arm using fine instruments or directly with the use of an angled endoscope.
6) Transforaminal approach
The transforaminal approach using an endoscope is probably results in the least morbidity of any approach. With the smallest incision and least muscle dissection, the procedure has the added advantage of being performed under local anesthesia. However, the indications of the approach are limited to soft disc herniations with a paracentral location. The procedure is similar to transforaminal endoscopic discectomy for lumbar herniations, and can be done with the same set of instruments. However, since the thoracic intervertebral foramina are smaller than those of the lumbar spine, a foraminoplasty is required to insert the cannula into the foramen. The procedure was first described by Choi et al. [26] and later reported in other studies [27,28].
Indications: Soft paracentral disc herniations at any level; patients with comorbidities precluding general anesthesia
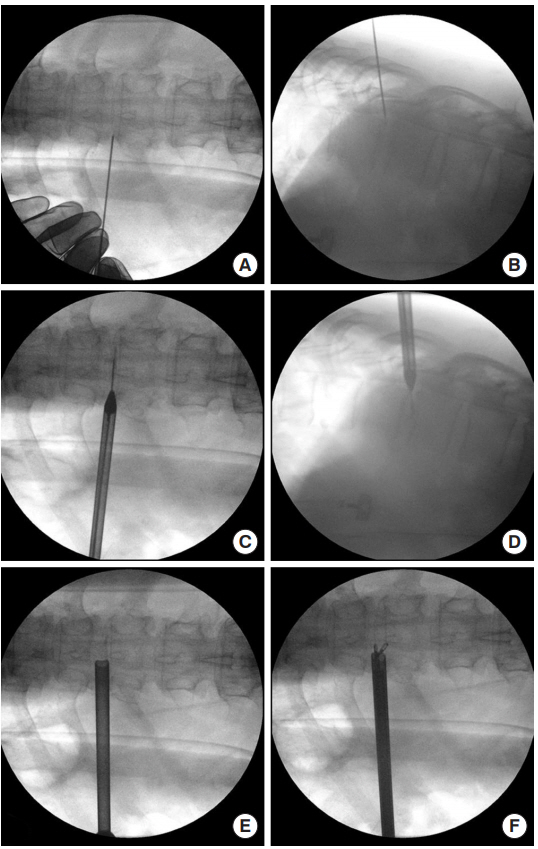
An example of a case is presented in Fig. 4. The procedure is as follows:
(1) The patient is placed prone on a Wilson frame on a radiolucent table under mild sedation.
(2) The skin entry point is marked on the axial view of a preoperative CT scan or MRI. To make the entry point, a line is drawn from the midpedicular annulus to the lateral facet and the line is extended on to the skin. The angulation is approximately 45° and approximately 5–6 cm from the midline.
(3) Under fluoroscopic guidance, a long 18-G needle is inserted, targeting the disc space of interest. Using intermittent AP and lateral views, the needle is guided parallel to the disc space into the upper endplate of the lower vertebral body on the lateral view and medial to the medial pedicular line on the AP view. After local infiltration, the needle is advanced into the disc space and discography is done.
(4) A guide wire is inserted and the needle is replaced with sequential reamers to enlarge the neural foramen. The reamers shave off the ventral aspect of the superior facet.
(5) Next, the obturator is passed to the lateral part of the facet and a beveled cannula is inserted. An endoscopic drill is used to remove the additional portion of the ventral aspect of the superior articular process and the upper portion of the caudal pedicle.
(6) Using endoscopic forceps, the herniated disc is removed under visualization. After decompression is complete, the movement of the thecal sac is identified by changing the irrigation pressure.
(7) The patient is asked about the relief of radicular pain before terminating the procedure. Adequate hemostasis is achieved before closing the incision.
Quite often, although not always, the ribs limit access to medially located herniations in the midthoracic spine. The curvature of the rib interferes with lateral tilting of the endoscope, making it difficult to reach the medial portion of the disc space. It should be mentioned that this approach is easiest in the lower thoracic spine, and it is similar to that for lumbar disc herniations.
7) Oblique paraspinal approach using tubular microendoscopic discectomy
The approach is essentially similar to the endoscopic transforaminal approach [28], but the trajectory is less oblique and the target for tube docking is the superior border of the caudal transverse process. The advantage over the endoscopic approach is that it can be used in cases of sequestered and calcified discs. The approach is similar to those described for thoracolumbar junctions [29] and has been modified by various authors [30].
Indications: Soft or calcified paracentral disc herniations.
The procedure is as follows:
(1) The patient is placed in prone position on a Wilson frame over a radiolucent table. General anesthesia is required for the procedure.
(2) The skin is incised about 4 cm lateral to the midline and the initial dilator is docked over the superior aspect of the base of the caudal transverse process. Following this, sequential dilators are placed, and an 18- or 20-mm tubular retractor is docked and attached to the table mount.
(3) Monopolar cautery is used to dissect the soft tissues of the lateral facet and the proximal transverse process.
(4) A high-speed drill is used to remove the rostral portion of the caudal transverse process and the lateral portion of the facet joint to expose the superior pedicle.
(5) After drilling the superior aspect of the pedicle, the foraminal bleeding is controlled with bipolar cautery.
(6) The exiting nerve root is carefully dissected and the disc herniation is removed using nerve hook and disc forceps.
(7) The wound is closed in layers after adequate hemostasis.
8) The transpedicular approach
The open transpedicular approach was described in 1978 by Patterson and Arbit [31] for TDH. Jho [32] described the endoscopeassisted minimally invasive approach in 2000. The procedure is similar to the transfacetal approach and utilizes a 70° lens endoscope fixed to the tubular retractor and special curved instruments bent 90° at the tip to facilitate removal of medially located disc herniation. However, the 70° lens endoscope is not familiar to many spine surgeons and may require practice.
Indications: Soft or calcified paracentral disc herniations.
(1) Under general anesthesia, the patient is placed in the lateral position with the approach side up. The patient is positioned 60° forward-inclined and an axillary roll is placed under the chest.
(2) The target level is identified under a C-arm and a 2-cm transverse incision is made from the lateral margin of the spinous process.
(3) The paraspinal muscles are dissected subperiosteally with a periosteal elevator. Alternatively, serial dilators may be used to split the muscle fibers. A tubular retractor is docked and fixed to the table.
(4) Under a microscope or a 0° lens endoscope, the medial portion of the facet and the superior portion of the rostral pedicle are drilled out. The landmark for drilling is the intersection of a line drawn along the inferior margin of the facet joint horizontally and the vertical line drawn along the midportion of the facet.
(5) The drilling exposes the disc and the lateral portion of the dura mater. The nerve root is located rostral to the disc. The lateral portions of the vertebral bodies adjacent to the disc are drilled out and the lateral portion of the disc removed to create a cavity.
(6) When a cavity measuring approximately 1.5 cm has been created, the 70° lens endoscope is introduced to visualize the ventral aspect of the dura.
(7) Under endoscopic visualization, the medial disc material can be removed using specialized angle curettes and disc punches after the cavity has been extended to the undersurface of the dorsally protruded discs.
(8) When adequate decompression is complete, the ventrally concave curvature of the dura bulges into the cavity, making a convex curvature.
(9) The bleeding is controlled and the wound is closed in layers.
INDICATIONS FOR FUSION
In single-level thoracic discectomy, using any approach, fusion is generally not required. However, fusion may be indicated under the following circumstances:
(2) Significant preoperative back pain
(3) Patients with multilevel discectomy
(4) Discectomy at the thoracolumbar junction [18]
(5) Extensive pedicle resection to approach the disc herniation
Relative indications for fusion include an existing kyphotic deformity or a previous history of laminectomy. The minimally invasive retropleural approach and the oblique paraspinal approach provide an adequate portal for cage insertion and fusion when required [35]. Navigation improves the precision and accuracy of decompression and implant placement.
GIANT THORACIC DISC HERNIATIONS
These are a special entity of TDH that require special mention. Giant TDH occupy more than 40% of the canal diameter on CT or MRI [36]. Identification of these herniations is important because they are frequently associated with myelopathy, are calcified in 90% of cases, and may have an intradural extension [34,37]. These attributes make them difficult to manage surgically [38]. They are associated with less favorable outcomes than small and medium-sized herniations [36]. An anterior transthoracic approach is almost always used for giant TDH, although its management by the retropleural approach has also been described [39]. Most often, surgery for these herniations requires a large portion of the vertebral body to be resected [34]. Hott et al. [36] described 2-level corpectomy and fixation as the standard of care for patients with giant TDH. A few authors have also reported thoracoscopy to be associated with unfavorable outcomes leading to neurological deterioration [37]. Our recommendation for these herniations is to approach them via a mini-open thoracotomy or the retropleural approach. This makes adequate room for the removal of the calcified mass and avoids cord manipulation. Dural repair, if required, may be performed through these approaches. Instrumentation may be necessary if excess bone must be removed.
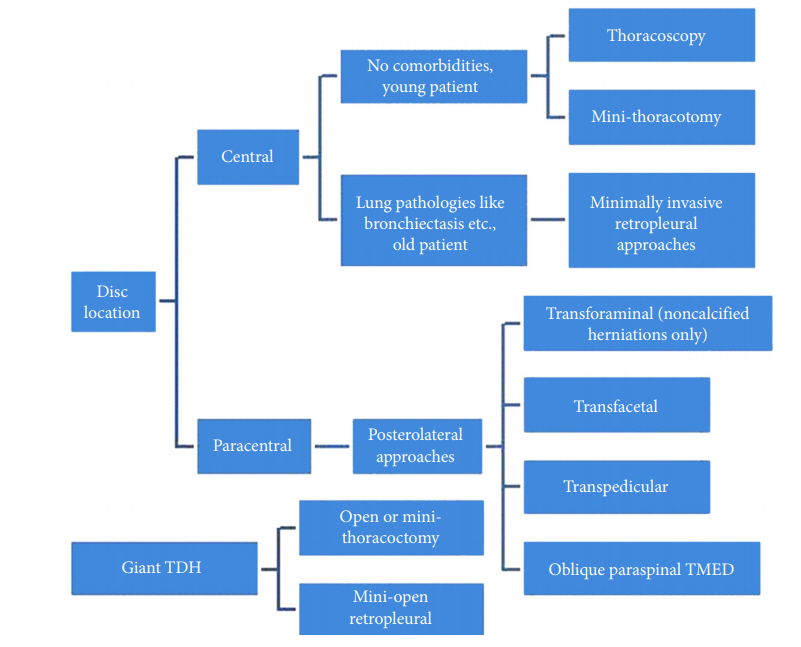
DECISION-MAKING
The location of the disc and the available armamentarium are important for selecting the approach for surgery. Grossly, paracentral discs are best approached by posterolateral approaches and central disc herniations are indications for a transthoracic or retropleural approach. A flow diagram to help in decisionmaking is depicted in Fig. 5.